Updated: Feb. 16, 2023
“How can I get more out of my rowing?” Very often, it begins with getting set up properly at the catch. A strong rowing catch position = more power from the drive = more results from the workout.
In this guest post, Master Instructor Alicia Clark shares tips for rowers learning how to row on a rowing machine. The post, which will also help coaches, will show you how to optimize this key part of the rowing stroke, and stay safe while doing it.
The Rowing Catch Position: A Primer
There’s a lot that goes into having a good catch position on the rowing machine.
For coaches and instructors, it may make the difference between a powerhouse row and a ho-hum one. Nail the catch and you’re set up for success on each and every stroke.
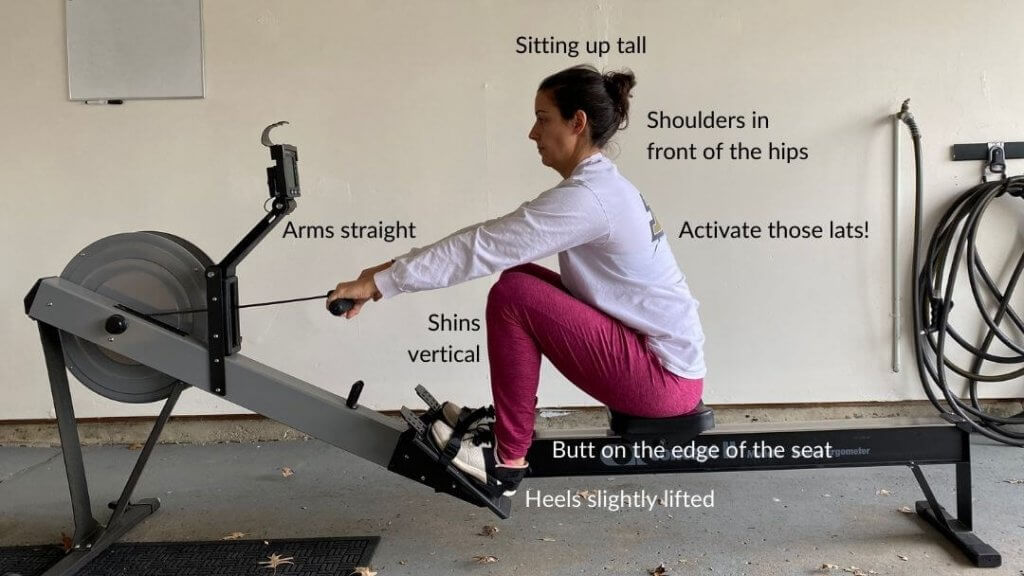
How to row on a rowing machine: A good catch position looks like this:
Use These Cues For a Strong Rowing Catch:
When learning or teaching someone how to row on a rowing machine, a good catch position is essential.
It’s all about getting the right setup, quickly, to allow for a powerful and fast drive.
Use these cues to make your own stroke better and more powerful, and be sure to have your rowers check them as well before every workout:
1- Glutes on the edge of the seat
Sitting on the seat correctly sets you up well for a lot of the following points. We want our sitz bones to be going directly down into the seat.
One way to make sure that you’re sitting correctly on the seat is to pick up your butt cheeks (A favorite phrase of UCanRow2 Lead Master Instructor Cassi Niemann)!
Yep I said it! Pick those babies up so you can get your hips in a more neutral position and lean forward.
Watch the video below to see exactly how to do it.
[Eds. note: A great cue for this from Alicia is, “Sit on the edge of your seat like you’re watching a suspenseful movie.”]
2- Shoulders in front of hips
Getting your shoulders in front of your hips sets you up for a better drive. After you push your legs down (on the drive) you’ll be able to swing your body open for more power.
The body swing accounts for 30% of the stroke’s power, and if you aren’t getting your shoulders in front of your hips to begin with, you’re missing out on all of that!
3- Sit up tall
Many athletes make the mistake of “overreaching” at the catch: Reaching so far forward that their chest touches their knees as they go for extra length. When we reach too far, though, we lose tension in our shoulders.
So on the next stroke, the first thing that has to happen is the shoulders have to pull back to engage, rather than the first step being the push with the legs.
Long story short, reaching at the catch wastes time and makes you lose power. The extra length isn’t worth it!
4-Shins vertical
Stopping when the shins are vertical (or perpendicular to the ground) is the perfect balance between applying power quickly and lengthening your stroke.
When we “overcompress” and allow our shins to go past vertical, it takes our heels much longer to come back into contact with the footplates on the drive.
We want to push through our heels on the drive, and when our heels come up too high, it’s easy to push through the balls of the feet instead.
Not everyone has the flexibility to make it all the way up to their shins being vertical, especially when first learning how to row on a rowing machine.
If it’s a mobility or pain issue, then come up as close to vertical as you can. Let the rowing machine meet you where you are.
NOTE: Stopping short of vertical cuts your stroke short. It’s OK for your heels to lift slightly at the rowing catch in order to get to shins vertical.
5- Heels slightly lifted
This will vary for everyone, but most people will need to lift their heels just slightly at the rowing catch to get their shins vertical. If your athlete has the flexibility to keep their heels down and still get their shins vertical, that’s awesome!
Ultimately, the goal isn’t what happens with the heels, but with the shins.
6-Arms straight
The arms should act like straps at the rowing catch position. If you follow Whiteboard Daily on Instagram, you may have heard the saying, “when the arms bend, the power ends” in regard to weightlifting.
The same is true in rowing!
Imagine you’re hanging off the erg handle when you begin to drive through your legs.
The best way to transfer that power is with straight arms! Bending them wastes precious energy that then can’t be put into getting a faster split.
7- Lats activated
The latissimus dorsi, often referred to as the “lats,” is the large V-shaped muscle that covers the width of the middle and lower back.
Turning it on before you start the drive portion of the rowing stroke will make a significant difference in your power generation.
As you sit at the catch preparing for the drive portion of the stroke then, think of sitting up tall and pulling your shoulders back and down.
This creates tension in the upper body that allows us to hang off the handle. When looking at the upper back and shoulders, imagine forming a letter J.
It’s the same kind of tension in our upper body that we create before we deadlift, clean, or snatch with a barbell. In order to lift properly, we need those lats engaged before (and not during) the lift.
Working on your rowing catch position will set you or your rowers up to get the strongest, most powerful stroke possible.
After all, starting the stroke right is the first step!
Want help with your rowing stroke? Check
Want workouts to help you practice your stroke? Get 5 rowing workouts that will also help you or your clients improve in 5 key areas of fitness
Notes on Coaching the Rowing Catch Position For Coaches / Instructors:
As coaches, it’s important to look carefully at your athletes’ catch position. Most importantly, it will help you keep your athletes safe, but it will also help them generate more power!
Notice how your athletes look when they start to change direction on the erg, going from the recovery to the drive. This snapshot in time can help you identify parts of the catch they may need to work on.
There are two areas, in particular, to look for. Read on, or scroll down to check the video.
1. Check that your athlete’s shins are coming to vertical
This is the easiest and most important thing to look for.
It’s pretty easy to see if a rower is overcompressing at the catch and their shins are going past vertical (see the photo below). This is important to check because knee pain can start to creep in if they are overcompressing.
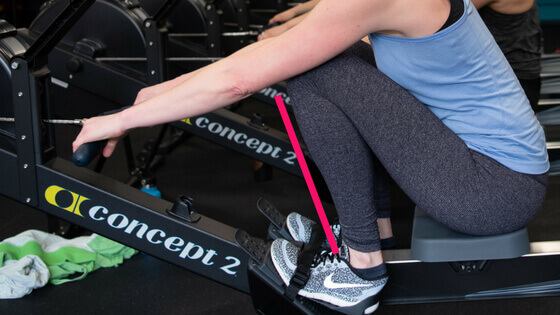
Overcompression at the catch can strain the knees and reduce power on the drive
A cue that I’ve found helpful here is to tell them to start the drive as soon as they feel their heels lift up.
This typically prevents athletes from lifting too much, overcompressing, and then delaying the push down into the drive.
Rowing coaching cue to avoid overcompression: Tell your athlete to start the drive as soon as they feel their heels lift at the catch. #rowing #fitness Share on X
Try this hack to stop overcompression
A physical cue that helps stop rowers from coming up too far is to wrap a band around the monorail right where their shins come to vertical.
Let them know that when they hit the band they need to start their drive. It will be rough at first, but over time your athletes will learn where the bad is, so the drive back will be more natural.
[Eds. note: Another way to do this is to use a piece of electrical tape on the top of the monorail. Put it in the same place as you would the band, just ahead of the front seat roller when your athlete is at shins vertical. Be sure to use only electrical tape and not duct tape, for example, which is hard to remove and leaves a sticky residue.]
2. Make sure the shoulders are in front of the hips
The next big thing to check is that your athlete’s shoulders are in front of their hips at the catch. If your rowers start their drive by leaning back first before they push with their legs, this can cause back pain over time.
A tactile cue that works well here is to use your hand to press down on their shoulders when they start the drive. This resistance from your hand will teach them to be patient before they open their hips.
Legs-only rowing would also help those athletes that lean back too soon.
Help your athletes start every stroke the best and safest way possible! Let’s get rowing!
Want MORE COACHING TIPS? Check out this video, then subscribe to our YouTube channel!
Ready to go all-in with coaching? Take our rowing instructor certification seminar! It’s available either live-coached online worldwide, in-person in select locations, or self-paced on-demand.
Get more information on certification here.
Did you try these tips, either for yourself or with your students if you’re a fitness professional? Let us know in the comments how it went!
For Further Reading:
- Rowing Technique: Dial in Your Damper Setting
- Trainer Technique Tips
- 3 Tips for Better Rowing Technique
Notes for coaches above has a mistake
Shoulders in front of HIPS. ( not knees)
Thank you for pointing that out, just fixed it!